Welcome to the world of DIY garage door repairs! Today, we’re going to tackle a common issue: replacing a garage door torsion tube. Curious to learn how? Let’s dive right in!
So, imagine this scenario: you’re in your garage, and suddenly you notice that the door is acting up. Maybe it’s making strange noises or struggling to open and close smoothly. Don’t worry, because replacing the torsion tube might be the solution you’ve been looking for.
But hold on a minute! Before we jump into the how-to, let’s understand what a torsion tube is and why it’s important for your garage door. Stay tuned as we walk you through the ins and outs of this vital component. Get ready to become a DIY expert!
Now that we’ve piqued your interest, let’s get down to business and discover how to replace a garage door torsion tube. Time to roll up your sleeves and embark on this exciting DIY journey! So, without further ado, let’s learn the steps you need to take to get your garage door up and running smoothly again. Let’s go!
- Disconnect the garage door opener.
- Release tension from the torsion springs.
- Remove the old torsion tube and springs.
- Install the new torsion tube and springs.
- Reattach the garage door opener.
- Test the door to ensure it’s functioning properly.
Follow these steps to safely and effectively replace your garage door torsion tube without any professional help.
How to Replace a Garage Door Torsion Tube: A Step-by-Step Guide
Garage doors play a crucial role in ensuring the security and functionality of your home. However, over time, various components of the garage door system may require maintenance or replacement. One such component is the torsion tube, which helps in the smooth operation of the garage door. In this article, we will guide you through the process of replacing a garage door torsion tube, ensuring that your garage door continues to function at its best.
1. Understanding the Function of a Garage Door Torsion Tube
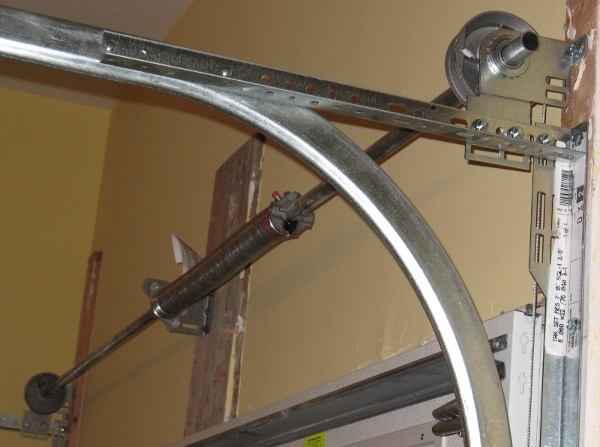
The torsion tube is a vital part of the garage door mechanism. It is a horizontal bar that runs parallel to the top of the door, holding the torsion springs in place. The torsion springs provide the counterbalance required to lift the heavy garage door smoothly. The torsion tube acts as a central axis, allowing the torsion springs to rotate and provide the necessary lifting force. Over time, the torsion tube may wear out or become damaged, necessitating its replacement.
In order to replace the torsion tube, it is essential to understand the correct procedure and have the necessary tools and equipment. This ensures that the replacement is carried out safely and effectively, preventing any further damage to the garage door system.
Before proceeding with the replacement, make sure to disconnect the power to the garage door opener and secure the door in its open position using sturdy clamps. Also, always consult the manufacturer’s manual for specific instructions pertaining to your garage door model.
2. Gathering the Required Tools and Equipment
Replacing a garage door torsion tube requires a specific set of tools and equipment. Before beginning the replacement process, gather the following items:
- Vice grips or adjustable pliers
- Cordless drill or screwdriver
- Winding bars
- Replacement torsion tube
- New torsion springs (if necessary)
- Measuring tape
- Safety glasses
- Gloves
Having these tools and equipment ready will ensure a smoother and more efficient replacement process.
3. Removing the Old Torsion Tube
The first step in replacing a garage door torsion tube is to remove the old one. Follow these steps:
- Securely clamp the garage door in its open position to prevent it from closing unexpectedly.
- Use vice grips or adjustable pliers to hold the torsion spring in place.
- Unwind the torsion spring using winding bars. Be cautious as the springs store a significant amount of tension.
- Once the tension is released, carefully remove the old torsion tube from its brackets.
- Inspect the torsion springs for any signs of wear or damage. Consider replacing them if necessary.
- Slide the replacement torsion tube into the brackets, ensuring that it is properly aligned.
- Attach the torsion springs to the new tube, making sure they are securely fastened.
- Wind the torsion springs using the winding bars, restoring the tension to the appropriate level.
- Test the balance of the garage door by gradually removing the clamps and allowing the door to rest on the torsion springs.
- If the door remains in place without any significant movement, the replacement torsion tube installation is successful.
- Remove the clamps holding the garage door open.
- Reattach the power supply to the garage door opener.
- Test the door by opening and closing it several times. Ensure that it moves smoothly and without any issues.
- Observe the overall performance of the garage door, paying attention to any unusual sounds or movements.
- If everything seems to be in order, the replacement of the garage door torsion tube is complete.
- Removing the old garage door torsion tube requires careful disassembly of the door’s components.
- Before starting the replacement process, make sure to disconnect the power to the garage door opener.
- Ensure you have the necessary tools, such as winding bars, wrenches, and vise grips.
- Replace the torsion tube by loosening the set screws and unwinding the tension from the springs.
- Lastly, carefully install the new torsion tube, following the reverse steps of the removal process.
The removal of the old torsion tube sets the stage for the installation of the replacement tube.
4. Installing the Replacement Torsion Tube
Now that the old torsion tube has been removed, it is time to install the new one. Follow these steps:
It is important to note that garage door torsion tubes and springs are under high tension. If you are not familiar with the replacement process and lack experience in dealing with garage door systems, it is highly recommended to hire a professional for the task. Safety should always be the top priority when working with garage doors.
5. Reconnecting the Power and Testing the Door
Once the replacement torsion tube is installed and the springs are properly tensioned, it is time to reconnect the power to the garage door opener. Follow these steps:
Regular maintenance and periodic inspections of the garage door system can help identify potential issues with the torsion tube early on, minimizing the need for replacements. Additionally, it is advisable to seek professional assistance if you are unsure about any aspect of the replacement process.
Common Troubleshooting Tips for Garage Door Torsion Tube Replacement
While the process of replacing a garage door torsion tube may seem straightforward, it is not without its challenges. Here are some common troubleshooting tips to help you address potential issues:
1. Issue: Misalignment
Solution: If the replacement torsion tube is not properly aligned with the brackets, it may cause the door to operate unevenly or get stuck. Carefully realign the tube and check for smooth movement before fully tightening the brackets.
2. Issue: Insufficient Tension
Solution: If the door does not stay in place or struggles to close, the torsion springs may not have enough tension. Use the winding bars to adjust the tension until the door operates smoothly and balances properly.
3. Issue: Excessive Noise or Vibrations
Solution: Loud noises or excessive vibrations during the garage door operation may indicate a problem with the torsion tube installation. Check all the connections and brackets for tightness and make sure the torsion springs are properly attached.
4. Issue: Inadequate Spring Strength
Solution: If the door feels heavy or struggles to lift, it could be due to weak or worn-out torsion springs. Consider replacing the springs along with the torsion tube to ensure optimal performance and safety.
By following these troubleshooting tips, you can address common issues that may arise during the garage door torsion tube replacement process. However, if you encounter any major difficulties or are unsure of how to proceed, it is always best to seek professional assistance.
Safety First: Precautions to Take During Garage Door Torsion Tube Replacement
Replacing a garage door torsion tube involves working with high-tension springs and heavy components, which can pose serious safety risks if not handled properly. Here are some essential safety precautions to keep in mind:
1. Use Protective Gear
Always wear safety glasses and gloves to protect your eyes and hands while working with garage door components. This will prevent any potential injuries from flying debris or accidents while handling heavy parts.
2. Disconnect the Power
Before starting any work on the garage door, disconnect the power to the garage door opener to avoid any accidental activations. This will prevent the door from unexpectedly closing while you are in the process of replacing the torsion tube.
3. Secure the Door
When working on the torsion tube, securely clamp the garage door in its open position using sturdy clamps. This ensures that the door remains stable and prevents it from closing unexpectedly, reducing the risk of accidents or injuries.
4. Release Tension Carefully
When releasing the tension from the torsion springs, exercise caution as they store a significant amount of force. Follow the manufacturer’s instructions and use winding bars to unwind the springs slowly and evenly.
5. Seek Professional Assistance if Needed
If you are unsure about any aspect of the garage door torsion tube replacement process or encounter any difficulties, do not hesitate to seek professional assistance. Expert technicians have the knowledge and experience to safely handle the replacement and address any issues that may arise.
By adhering to these safety precautions, you can minimize the risk of accidents and injuries while replacing the garage door torsion tube. Safety should always be a top priority when working with garage door systems.
Regular Maintenance: Key to a Well-Functioning Garage Door
Proper maintenance is essential to keep your garage door in optimal condition and ensure its smooth operation. Here are some additional tips to help you maintain your garage door system:
1. Perform Visual Inspections
Regularly inspect the garage door and its components for any signs of wear, damage, or misalignment. Look for rust, broken cables, loose bolts, or any other issues that may affect the functionality of the door.
2. Lubricate Moving Parts
Apply lubricant to the garage door tracks, rollers, hinges, and springs to reduce friction and keep the components moving smoothly. Use a silicone-based lubricant for best results and avoid using excessive amounts.
3. Test Safety Features
Periodically test the safety features of your garage door, such as the auto-reverse mechanism. Place a small object, like a block of wood, in the door’s path and check if it reverses when it comes in contact with the object. If not, the safety feature may require adjustment or repair.
4. Keep the Tracks Clean
Regularly clean the garage door tracks of any debris, dirt, or obstructions that may hinder the smooth movement of the door. Use a soft cloth or brush to remove any buildup and ensure optimum performance.
5. Schedule Professional Maintenance
At least once a year, consider hiring a professional technician to perform a comprehensive inspection and maintenance of your garage door system. They can identify potential issues early on and make any necessary adjustments or repairs to ensure the long-term functionality of your garage door.
By following these maintenance tips, you can prolong the lifespan of your garage door and minimize the need for major repairs or replacements. A well-maintained garage door offers enhanced security, convenience, and peace of mind for homeowners.
Summing It Up
Replacing a garage door torsion tube involves a careful and systematic process. By understanding the function of a torsion tube, gathering the necessary tools, and following the step-by-step installation process, you can successfully replace a torsion tube and maintain the optimal functionality of your garage door. Safety precautions, regular maintenance, and troubleshooting tips are essential to ensure a smooth and safe replacement process. Remember, when in doubt, it is always best to consult a professional for assistance.
Key Takeaways: How to Replace a Garage Door Torsion Tube
Frequently Asked Questions
When it comes to replacing a garage door torsion tube, there are a few important things to consider. Below are some common questions and answers to help you navigate the process with ease.
1. How do I know if my garage door torsion tube needs to be replaced?
There are a few signs that indicate a damaged or faulty torsion tube. If you notice excessive shaking or vibrating when operating the garage door, or if the door doesn’t open or close smoothly, it may be time to replace the torsion tube. Another telltale sign is if you notice fraying or unraveling of the cables attached to the tube. It’s best to consult a professional for an accurate assessment before proceeding with the replacement.
Keep in mind that attempting to replace the torsion tube yourself without the necessary knowledge or experience can be dangerous. It’s always recommended to hire a qualified garage door technician for this type of repair.
2. What tools do I need to replace a garage door torsion tube?
Replacing a garage door torsion tube requires specific tools to ensure a safe and successful installation. The necessary tools include winding bars, a wrench or socket set, a sturdy ladder, safety goggles, and gloves. It’s crucial to have the correct tools on hand before starting the replacement process to avoid any unnecessary delays or complications.
If you’re unsure about the tools needed or how to use them, it’s best to consult a professional for guidance. They will have the expertise to safely and efficiently replace the torsion tube, ensuring the longevity and proper functioning of your garage door.
3. Can I replace the garage door torsion tube on my own?
While it may be tempting to tackle the replacement yourself to save money, it’s highly recommended to hire a professional for this task. Replacing a garage door torsion tube requires specialized knowledge and experience. Mishandling the process can lead to serious injuries or further damage to your garage door system.
A professional technician will have the necessary expertise to safely remove the old torsion tube, install the new one, and properly balance the garage door for optimal performance. They will also ensure that all safety measures are followed, minimizing the risk of accidents. Investing in a professional’s services will save you time, provide peace of mind, and ultimately result in a safer and more reliable garage door.
4. How long does it take to replace a garage door torsion tube?
The time required to replace a garage door torsion tube can vary depending on various factors, such as the complexity of the garage door system and the experience of the technician. On average, a professional can complete the replacement process within a few hours.
It’s important to note that rushing through the replacement can lead to mistakes or improper installation, which may cause further issues down the line. Therefore, it’s crucial to allow ample time for the replacement to ensure that it is done correctly.
5. How much does it cost to replace a garage door torsion tube?
The cost of replacing a garage door torsion tube can vary depending on several factors, including the type of garage door, the complexity of the system, and the location. On average, the cost can range from $150 to $500, including the labor and materials required for the replacement.
It’s recommended to obtain quotes from multiple reputable garage door repair companies to ensure you receive a fair price. Keep in mind that while cost is important, it’s equally crucial to prioritize the quality of the service and the expertise of the technician to ensure a long-lasting and reliable replacement.

Summary
Replacing a garage door torsion tube might seem complicated, but it can be done. First, gather all the necessary tools like a wrench and winding bars. Then, follow the steps carefully, starting with releasing the tension on the old torsion tube. Next, remove the old tube and install the new one, making sure it’s aligned properly. Finally, wind the torsion spring and test the door to ensure it’s working correctly.
Remember, safety is essential throughout the process. Always wear protective gear and be cautious when dealing with the heavy garage door and its components. If you’re unsure or uncomfortable with the task, it’s best to hire a professional to do it for you. With these tips, you can successfully replace a garage door torsion tube and keep your garage door functioning smoothly.