Have you ever wondered how to program a rolling code garage door opener remote? Look no further! In this article, we will walk you through the simple steps to get your garage door opener remote up and running in no time. Whether you’re a technology enthusiast or just looking to tackle a DIY project, programming your garage door opener remote is easier than you might think. So, let’s dive right in and get started with this handy guide!
Programming a rolling code garage door opener remote involves a few straightforward steps that anyone can follow. With just a few minutes of your time and a little patience, you’ll be able to synchronize your remote with your garage door opener. Say goodbye to the days of fumbling with keys or struggling to manually open your garage door. With a properly programmed remote, you can effortlessly open and close your garage door with a simple push of a button. Ready to take control? Let’s jump right in!
Before we dive into the programming process, it’s essential to understand what a rolling code garage door opener remote is. Unlike fixed code remotes, which use the same code every time you press a button, rolling code remotes generate a new code each time you use them. This added security feature prevents unauthorized access to your garage. Now that you have a good grasp of the basics, let’s move on to the step-by-step instructions to program your rolling code garage door opener remote. Get ready to become a garage door programming pro!
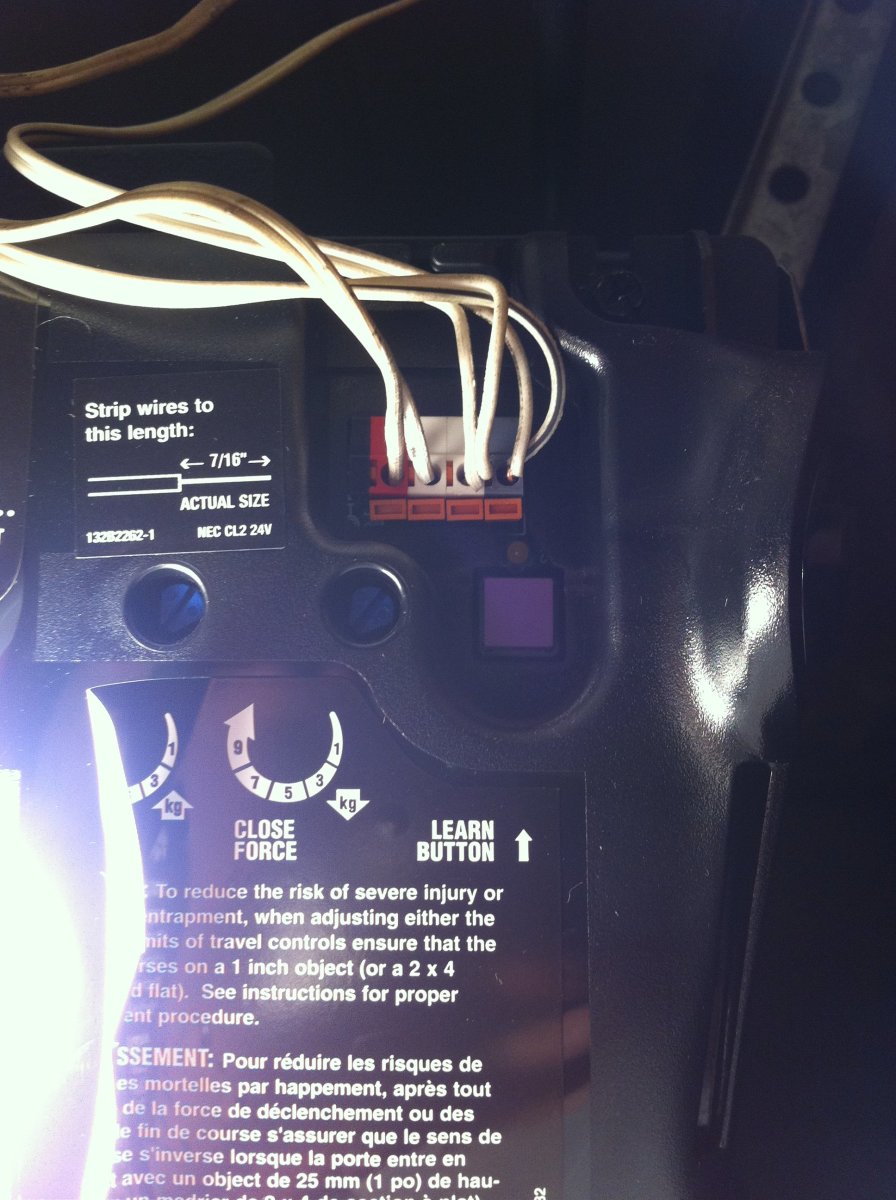
- Locate the “Learn” button on your garage door opener motor unit.
- Press and release the “Learn” button, then quickly press and hold the button on the remote you want to program.
- Release the remote button when the garage door opener lights blink or you hear a click.
- Test the remote by pressing the button to ensure the garage door opens or closes.
- Repeat these steps for any additional remotes you want to program.
How to Program a Rolling Code Garage Door Opener Remote
Welcome to our comprehensive guide on how to program a rolling code garage door opener remote. If you’re looking to enhance the security of your garage, a rolling code garage door opener remote is a great option. In this article, we’ll provide you with step-by-step instructions on how to program your remote for maximum convenience and safety. Let’s dive in!
Understanding Rolling Code Garage Door Opener Remotes
Before we jump into the programming process, let’s take a moment to understand what a rolling code garage door opener remote is. Unlike traditional garage door openers, rolling code remotes use a unique code every time you press the button. This code changes automatically, making it incredibly difficult for intruders to replicate or intercept. Rolling code remotes provide an added layer of security and are commonly used in modern garage door systems.
When you purchase a new rolling code garage door opener remote, it needs to be programmed to communicate with your specific garage door opener. The programming process may vary slightly depending on the make and model of your remote and opener. However, the general steps we’ll outline in this guide should apply to most rolling code remotes.
Now that we have a basic understanding of rolling code remotes, let’s move on to the programming process.
Gathering the Necessary Equipment
Before you begin programming your rolling code garage door opener remote, make sure you have all the necessary equipment. Typically, you’ll need the following:
- The rolling code garage door opener remote
- The garage door opener unit
- A ladder (if needed to access the opener unit)
- A pen and paper to record any codes or instructions
Ensure that the remote and opener unit are within close proximity to each other, as this will be necessary for the initial programming steps.
Step-by-Step Programming Instructions
Now that you have all the required equipment, let’s dive into the step-by-step instructions to program your rolling code garage door opener remote:
- Locate the “Learn” or “Program” button on your garage door opener unit. It is typically found on the back or side of the unit.
- Press and release the “Learn” or “Program” button. You will usually have about 30 seconds to complete the next step.
- On your remote, press and hold the button you want to use to operate the garage door. This could be any of the available buttons, depending on your remote’s design.
- While holding the button, simultaneously press and release the “Learn” or “Program” button on the opener unit again. You may hear a beep or see a flashing light to indicate that the pairing process has begun.
- Release the button on the remote. At this point, the opener unit and remote should communicate and sync up. You may see or hear another indication that the programming was successful, such as a second beep or a flashing light.
- Test the remote by pressing the button you just programmed. The garage door should respond accordingly, either opening or closing.
- If the remote doesn’t work as expected, repeat the steps above. Make sure to complete each step within the specified time frames, as some opener units may time out if the programming process takes too long.
Once you have successfully programmed your rolling code garage door opener remote, you can enjoy the convenience and enhanced security it provides. If you have multiple doors or remotes, you may need to repeat the programming process for each one.
Additional Tips for Programming Success
While the basic programming steps outlined above should work for most rolling code garage door opener remotes, here are a few additional tips to ensure success:
Check the Opener’s Manual or Manufacturer’s Website
If you’re unsure about any specific details or instructions for your particular garage door opener model, consult the opener’s manual or the manufacturer’s website. They may have additional resources or troubleshooting guides.
Clear Any Existing Codes
If you’re reprogramming a remote or experiencing issues, it’s a good idea to clear any existing codes from the opener unit before starting the programming process. Consult your opener’s manual for instructions on how to do this.
Keep Track of Codes and Instructions
It’s always helpful to record any codes or instructions during the programming process. This way, you’ll have a reference in case you need to reprogram the remote in the future or troubleshoot any issues.
Common Troubleshooting Steps
If you encounter any issues while programming your rolling code garage door opener remote, here are some common troubleshooting steps:
Check the Batteries
Make sure the batteries in your remote are fresh and properly installed. Weak or dead batteries can prevent successful programming.
Range and Interference
Ensure that you’re within a reasonable range of the garage door opener unit. Interference from other electronic devices or obstructions can disrupt the programming process. Try moving closer to the opener unit and eliminating any potential sources of interference.
Reset the Opener Unit
If all else fails, you can try resetting the opener unit to its factory settings. Consult your opener’s manual for specific instructions on how to do this. Keep in mind that resetting the unit will erase all programmed remotes, so you’ll need to reprogram all your remotes afterwards.
With these tips and troubleshooting steps in mind, you should now be well-equipped to successfully program your rolling code garage door opener remote. Remember to consult the manual or manufacturer’s resources if you encounter any specific issues. Happy programming!
Key Takeaways: How to Program a Rolling Code Garage Door Opener Remote
- 1. Make sure you have the correct remote for your garage door opener model.
- 2. Locate the “Learn” or “Program” button on your garage door opener unit.
- 3. Press and release the “Learn” or “Program” button on the opener.
- 4. Within 30 seconds, press and hold the button on the remote until the opener’s lights flash.
- 5. Test the remote by pressing the button to open or close the garage door.
Frequently Asked Questions
Welcome to our Frequently Asked Questions section about programming a rolling code garage door opener remote. Here, we address common queries regarding this topic to help you better understand how to program your remote control. Read on to find the answers you’re looking for!
1. How do I program a rolling code garage door opener remote?
Programming a rolling code garage door opener remote is a straightforward process. First, locate the “Program” or “Learn” button on your garage door opener unit. Press and release this button within 30 seconds of starting the programming process. Afterward, within 30 seconds, press and hold the desired button on your remote control until the garage door opener lights flash or you hear a sound. Finally, test the remote by pressing the button to see if the garage door opens or closes. Repeat these steps for any additional remotes.
It’s worth noting that the exact steps might vary slightly depending on your garage door opener model, so it’s always a good idea to consult the manufacturer’s manual for specific instructions. Additionally, it’s important to ensure your remote control and garage door opener are compatible before attempting to program the remote.
2. Can I program multiple rolling code garage door opener remotes?
Yes, you can definitely program multiple rolling code garage door opener remotes. Most garage door opener systems allow you to program multiple remotes to operate the same garage door. To do this, start by programming the first remote using the steps provided by the manufacturer. Once the first remote is programmed, you can follow the same steps to program additional remotes. Remember to press and release the “Program” or “Learn” button on the opener unit and then press and hold the desired button on each remote until the garage door opener lights flash or you hear a sound.
By programming multiple remotes, you can conveniently share access to your garage with family members or household members. Just make sure to follow the specific instructions provided with your garage door opener model for accurate programming.
3. How do I reset a rolling code garage door opener remote?
If you need to reset a rolling code garage door opener remote, the process may vary depending on the specific model you have. In general, the reset procedure involves erasing all codes from the remote control and reprogramming it from scratch. Typically, you can reset the remote by locating the “Program” or “Learn” button on the opener unit and pressing and holding it for a specific amount of time, as mentioned in the manufacturer’s instructions. This action usually clears the current codes, allowing you to program the remote as if it were new.
It’s important to note that resetting a remote control will also remove any previously programmed remotes, so you’ll need to reprogram them as well. Refer to the manual or contact the manufacturer for the exact steps to reset your rolling code garage door opener remote.
4. Why is my rolling code garage door opener remote not working after programming?
If your rolling code garage door opener remote is not functioning correctly after programming, there could be a few possible reasons. Firstly, ensure that the battery in the remote is fresh and installed correctly. If the battery is low or incorrectly inserted, it may prevent the remote from working properly. Additionally, make sure that you are within the range specified by the manufacturer when attempting to operate the remote.
If the battery is not the issue and you are within the proper range, it’s possible that the programming process was not completed correctly. Double-check that you followed the programming steps accurately and try programming the remote again. If the problem persists, consult the manufacturer’s troubleshooting guide or contact their customer support for further assistance.
5. Can I program a rolling code garage door opener remote without the help of a professional?
Yes, you can program a rolling code garage door opener remote without the assistance of a professional. The programming process is designed to be user-friendly, allowing homeowners to easily program their remotes. However, it’s crucial to carefully follow the manufacturer’s instructions specific to your garage door opener model. These instructions will guide you through the programming steps and ensure successful programming.
If you encounter any difficulties during the process or have concerns about programming the remote on your own, you can always consult the manufacturer’s customer support or refer to online resources for additional guidance. With a little patience and attention to detail, you can successfully program a rolling code garage door opener remote and enjoy the convenience it brings to your daily life.
Summary
So, here’s the deal: programming a rolling code garage door opener remote is not as complicated as it sounds. First, find the learn button on the opener unit. Then, press that button and, within 30 seconds, press the desired button on the remote. And voila! Your remote is programmed!
When it comes to changing the code, things are pretty straightforward too. Just press the learn button on the opener unit, wait for the light to turn on, press the desired button on the remote, and you’re good to go. Easy peasy, right? So, go ahead and give it a try!