So, you’ve got yourself a custom garage door, huh? That’s cool! But now you’re faced with a little challenge – adjusting the travel limits for your garage door opener. Don’t worry, my friend, I’ve got you covered! In this article, I’m going to show you exactly how to tackle this task like a pro.
Now, adjusting the travel limits of your garage door opener might sound a bit daunting, but fear not! I’m here to break it down for you in simple steps that even a 13-year-old can follow. So, grab your toolbox and let’s get started on this exciting DIY adventure!
With a few adjustments, you’ll have that custom door opening and closing smoothly in no time. So, let’s roll up our sleeves and dive right into the world of garage door opener travel limits adjustments. Trust me, you’ll be a pro in no time!
1. Locate the travel limit adjustment screws on the opener unit.
2. Use a screwdriver to turn the limit adjustment screws in the desired direction.
3. Test the door’s movement by opening and closing it manually.
4. Adjust the screws incrementally until the door stops at the desired positions.
5. Once adjusted, secure the screws tightly.
Remember to consult your garage door opener’s manual for specific instructions.
Crafting a precise adjustment to accommodate your custom door enhances its functionality and ensures proper operation.

How to Adjust Garage Door Opener Travel Limits for a Custom Door?
Welcome to our comprehensive guide on adjusting garage door opener travel limits for a custom door! In this article, we will walk you through the process of fine-tuning the travel limits of your garage door opener to ensure smooth and precise operation for your unique custom door. Whether you have recently installed a new custom door or need to make adjustments to your existing setup, we have got you covered. With our step-by-step instructions and helpful tips, you’ll be able to optimize the performance of your garage door opener and enjoy hassle-free operation.
Understanding Garage Door Opener Travel Limits
Garage door opener travel limits refer to the distance your garage door travels when opening and closing. These limits dictate how far the door moves to ensure proper alignment with the opening and closing position. When installing a custom door, it is crucial to adjust these travel limits to accommodate the door’s unique size and weight. Failure to do so can result in the door not opening or closing completely, leaving gaps or causing strain on the opener system. By adjusting the travel limits, you ensure smooth operation and prevent unnecessary wear and tear on the door and opener.
Before we dive into the adjustment process, let’s briefly go over the two types of garage door opener systems commonly used: chain drive and belt drive. Chain drive systems use a metal chain to operate the door, while belt drive systems utilize a rubber belt. Both systems have similar travel limit adjustment processes, but there may be slight differences in the hardware and controls. Make sure to consult your garage door opener’s manual for specific instructions regarding your model.
Step-by-Step Guide: Adjusting Garage Door Opener Travel Limits
Now that you understand the importance of adjusting garage door opener travel limits for a custom door, let’s dive into the step-by-step process. Remember to follow these instructions carefully and consult your garage door opener’s manual for any model-specific guidance:
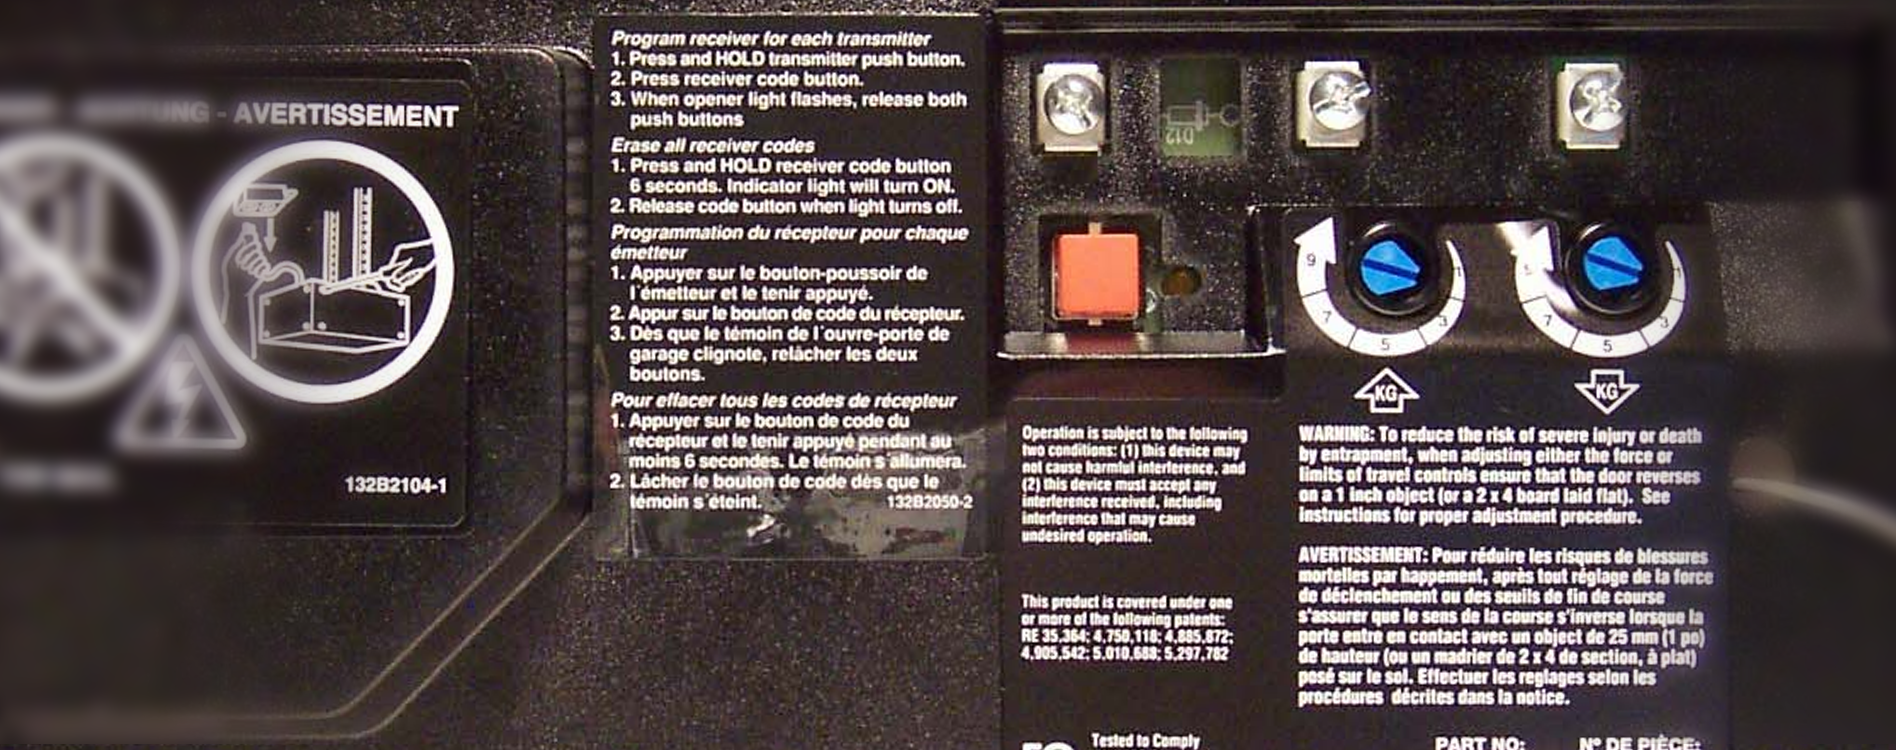
- Locate the opener’s limit adjustment screws: Most garage door openers have two limit adjustment screws, one for the up/open limit and one for the down/close limit. These screws are usually labeled or highlighted in the opener housing.
- Determine the starting position: Fully close your garage door and use a ladder to access the opener unit. Take note of the position of the limit adjustment screws in the closed position, as this will serve as your reference point for adjustment.
- Adjust the open/up limit: Using a flat-head screwdriver, turn the open/up limit adjustment screw in the appropriate direction to increase or decrease the open travel distance. Make small adjustments at a time, testing the door’s operation after each adjustment. Continue making adjustments until the door opens fully without hitting the opener housing or stopping short of the desired position.
- Adjust the close/down limit: Similar to the open/up limit adjustment, use a screwdriver to turn the close/down limit adjustment screw in the necessary direction to increase or decrease the close travel distance. Again, make small adjustments and test the door’s movement until it reaches the closed position without hitting the floor or stopping prematurely.
- Test the door’s operation: Once you have adjusted both travel limits to the desired positions, test the door’s operation multiple times to ensure smooth and precise movement. Make any necessary fine-tuning adjustments if needed.
Remember, patience is key when adjusting garage door opener travel limits. It may take several attempts to find the perfect settings for your custom door. Don’t rush the process and always prioritize safety by disconnecting power to the opener before making any adjustments.
Common Pitfalls and Troubleshooting Tips
While adjusting garage door opener travel limits for a custom door, you may encounter a few common issues. Here are some troubleshooting tips to help you overcome these challenges:
Door Not Fully Closing
If your garage door stops before reaching the fully closed position despite adjusting the travel limits, there are several possible causes:
- Check for obstructions: Remove any objects or debris blocking the door’s path, preventing it from closing completely.
- Inspect the safety sensors: Make sure the safety sensors are aligned properly, and nothing is obstructing their view. Clean the sensors to remove any dirt or debris that may interfere with their operation.
- Adjust the close force setting: If the door encounters resistance while closing, it may falsely detect an obstruction and stop prematurely. Adjust the close force setting on the opener to a slightly higher value to allow for smoother closing.
Door Not Opening Fully
If your garage door fails to open fully despite adjusting the travel limits, consider the following troubleshooting steps:
- Inspect the door’s balance: An imbalanced door can put strain on the opener system and prevent it from opening fully. Consult a professional garage door technician to balance the door if necessary.
- Check for loose or worn-out hardware: Make sure all screws, bolts, and rollers are secure and in good condition. Tighten or replace any loose or damaged components that may be affecting the door’s movement.
- Adjust the open force setting: If the opener encounters resistance while opening, it may mistakenly assume an obstruction and stop prematurely. Adjust the open force setting to a slightly higher value to allow for smoother opening.
By following these troubleshooting tips, you can overcome common issues and fine-tune your garage door opener travel limits for optimal performance. Remember, if you are unsure or uncomfortable with any part of the adjustment process, it is always best to consult a professional garage door technician for assistance.
Additional Tips for Custom Garage Doors
Now that you have mastered the art of adjusting garage door opener travel limits for a custom door, here are some bonus tips to keep in mind:
Regular Maintenance
Regular maintenance is crucial to keep your custom garage door and opener functioning at their best. Inspect the door and opener for any signs of wear or damage, and lubricate the moving parts as recommended by the manufacturer. Additionally, clean the tracks and remove any debris that may affect the door’s movement. By staying on top of maintenance tasks, you can extend the lifespan of your custom door and ensure smooth operation.
Consider Insulation
If your custom garage door is not already insulated, consider adding insulation to improve energy efficiency and reduce noise. Insulation helps regulate temperature inside the garage and provides a barrier against external noise. Check with your local garage door supplier for insulation options that are compatible with your custom door.
Security Measures
Custom garage doors often command attention due to their unique design and materials. It is essential to invest in proper security measures to protect your valuable possessions and enhance the safety of your home. Consider installing a robust security system and reinforcing the door with additional locks or reinforcements. Consult a security professional for expert advice tailored to your specific needs.
With our comprehensive guide on adjusting garage door opener travel limits for a custom door and these additional tips, you are well-equipped to ensure optimal performance, longevity, and security for your unique garage door. Remember to follow safety precautions, consult your garage door opener’s manual when in doubt, and don’t hesitate to seek professional assistance if needed. Enjoy hassle-free operation and the beauty of your custom garage door!
Key Takeaways: How to Adjust Garage Door Opener Travel Limits for a Custom Door?
- Adjusting the travel limits of a garage door opener ensures proper functioning.
- Locate the adjustment screws on the opener unit.
- Turn the limit adjustment screw clockwise to increase the opening or counterclockwise to decrease it.
- Experiment with opening and closing the door to find the ideal travel limits.
- Make sure to perform regular maintenance on your custom garage door for smooth operation.
Frequently Asked Questions
It’s time to adjust your garage door opener travel limits for a custom door. Here are some common questions and answers to help you with the process.
1. How do I determine the correct travel limits for my custom garage door?
To determine the correct travel limits for your custom garage door, start by closing the door completely. Then, press and hold the wall button or remote control to open the door. As the door opens, pay attention to when it reaches its highest point and stops. This is the fully open position. Next, let the door close completely and mark the position where it stops. This is the fully closed position. Measure the distance between the fully open position and the fully closed position to determine the travel limits for your door.
Once you have the measurements, consult your garage door opener’s manual for instructions on how to adjust the travel limits. Typically, this involves locating the limit adjustment screws on the opener unit and turning them clockwise or counterclockwise to adjust the limits to the desired positions. Make sure to test the door’s movement after making the adjustments to ensure it opens and closes smoothly and aligns with the desired travel limits.
2. Why is it important to adjust the travel limits for a custom garage door?
Adjusting the travel limits for a custom garage door is important to ensure the door fully opens and closes without encountering any obstructions or causing damage to the door or opener. The travel limits control the distance the door travels during its opening and closing cycles, and it’s essential for them to be set correctly to prevent any issues.
If the travel limits are not adjusted properly, the door may not open or close all the way, leaving a gap that compromises security or preventing the door from closing properly, potentially allowing unwanted pests or weather elements to enter your garage. By adjusting the travel limits to match the specific dimensions and movement of your custom door, you can ensure smooth and reliable operation.
3. Can I adjust the travel limits on my garage door opener myself?
Yes, in most cases, you can adjust the travel limits on your garage door opener yourself. However, it’s important to follow the instructions provided in your opener’s manual to ensure you make the correct adjustments safely and accurately. The manual will guide you on locating the limit adjustment screws and what direction to turn them to adjust the travel limits.
Before making any adjustments, it’s crucial to disconnect the power to the opener to prevent any accidental activation. Additionally, it’s recommended to make small incremental adjustments and test the door’s movement after each adjustment to ensure it is functioning properly. If you are unsure or uncomfortable with adjusting the travel limits yourself, it’s always best to seek professional assistance.
4. How often should I check and adjust the travel limits for my custom garage door?
It’s a good idea to check and adjust the travel limits for your custom garage door at least once a year. Over time, factors such as temperature changes, door usage, and normal wear and tear can cause the travel limits to shift. By regularly checking and adjusting the limits, you can maintain optimal performance and prevent any potential issues.
In addition to annual adjustments, it’s important to check the travel limits whenever you notice any changes in the door’s movement. If the door is not opening or closing fully, or if it seems to be straining or making unusual noises during operation, it may be a sign that the travel limits need to be readjusted. Addressing these issues promptly can help prolong the lifespan of your garage door opener and prevent more significant problems down the line.
5. What should I do if I am unable to adjust the travel limits for my custom garage door?
If you are unable to adjust the travel limits for your custom garage door or if you encounter any issues during the adjustment process, it’s recommended to consult a professional garage door technician. They have the knowledge and experience to identify and resolve any problems with your garage door opener and can ensure the travel limits are set correctly for your custom door.
Attempting to force or manipulate the travel limits without proper understanding or guidance can potentially cause damage to the opener or the door itself. By seeking professional assistance, you can have peace of mind knowing that the adjustments will be handled correctly, and your custom garage door will operate smoothly and safely.
Summary
So, to sum it all up, adjusting the travel limits of your garage door opener is important for ensuring that your custom door opens and closes properly. By following the manufacturer’s instructions and using the provided tools, you can easily make these adjustments yourself. Just remember to be careful and make small adjustments to avoid damaging the door or the opener. With a little patience and attention to detail, you’ll have your garage door running smoothly in no time!