Are you wondering how to adjust your garage door opener force settings? Well, you’ve come to the right place! In this guide, we’ll walk you through the process in a simple and easy-to-understand way. So let’s dive in and learn how to make your garage door opener work just the way you want it to!
Picture this: you’re sitting in your car, ready to head out, but your garage door won’t budge. Frustrating, right? That’s where adjusting the force settings of your garage door opener comes in handy. By tweaking these settings, you can ensure that your garage door opens and closes smoothly, without any hiccups.
But hold on a second, you might be wondering, what are force settings anyway? Well, think of them as the “strength” your garage door opener uses to lift and lower the door. Adjusting these settings allows you to fine-tune the force required to operate the door. Whether it’s a heavy wooden door or a lightweight aluminum one, you can customize the force to suit your needs. Cool, huh?
Now that you know the importance of adjusting garage door opener force settings, let’s get into the nitty-gritty. We’ll guide you step by step, ensuring that you have a stress-free experience. So buckle up and get ready to become a pro at adjusting your garage door opener force settings in no time!
If you’re wondering how to adjust the force settings on your garage door opener, follow these simple steps:
- Locate the force adjustment knobs on the opener unit.
- Use a screwdriver to turn the knobs clockwise to increase force or counterclockwise to decrease force.
- Test the door’s balance after each adjustment.
- Continue adjusting until the door opens and closes smoothly without hesitation.
With these steps, you’ll have your garage door opener force settings adjusted in no time!
How to Adjust Garage Door Opener Force Settings?
Having a properly functioning garage door opener is crucial for the safety and convenience of your garage. However, over time, you may notice that your garage door opener force settings need adjustment. This article will guide you step by step on how to adjust the force settings of your garage door opener to ensure smooth and safe operation. Read on to learn more!
Why Do You Need to Adjust Garage Door Opener Force Settings?
Before we dive into the process of adjusting garage door opener force settings, it’s important to understand why it is necessary. The force settings determine how much force the opener uses to open and close the garage door. If the force settings are too high, it can potentially damage the garage door or the opener. On the other hand, if the force settings are too low, the garage door may not close properly or reverse unexpectedly. By adjusting the force settings, you can ensure that your garage door operates smoothly and safely.
Step 1: Understand Your Garage Door Opener
The first step in adjusting the force settings of your garage door opener is to understand the type of opener you have. There are generally two types of openers – chain drive and belt drive. Chain drive openers use a metal chain to operate the door, while belt drive openers use a rubber belt. Understanding the type of opener you have will help you locate the necessary adjustments to be made.
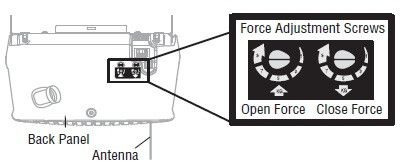
Once you have identified the type of opener, locate the force adjustment screws. These screws are usually located on the back or side of the opener motor. Consult your garage door opener’s manual for the exact location of these screws, as it may vary depending on the model and manufacturer.
It’s important to note that adjusting the force settings should only be done in small increments to avoid causing any damage to the opener or door. Make sure to follow the manufacturer’s instructions and proceed with caution.
Step 2: Adjusting the Force Settings
Now that you have located the force adjustment screws, you can begin the process of adjusting the force settings. Start by opening the garage door fully using the opener. Then, place a piece of wood or another object of similar size under the door to test the force of the closing operation. This will help you determine if the force is too high or too low.
Using a screwdriver, turn the force adjustment screws clockwise to increase the force or counterclockwise to decrease the force. Make small adjustments at a time and test the closing operation after each adjustment. The goal is to find the perfect balance where the door closes smoothly without excessive force or resistance.
Keep in mind that the force settings may need to be adjusted separately for the opening and closing operations. Follow the same process for adjusting the force for both cases to ensure proper functionality.
Step 3: Test and Fine-tune
Once you have made the initial adjustments to the force settings, it’s important to test the garage door’s operation. Open and close the door multiple times to ensure that it moves smoothly without any issues. Pay attention to any unusual sounds, resistance, or delays in the operation.
If you notice any issues, such as the door not closing all the way or reversing unexpectedly, you may need to fine-tune the force settings further. Make small adjustments in the appropriate direction and test the door’s operation each time until you achieve the desired results.
It’s also important to periodically check and readjust the force settings as needed. Over time, the force requirements may change due to temperature fluctuations, wear and tear, or other factors. Regular maintenance and adjustments will ensure the long-term functionality and safety of your garage door opener.
Conclusion
Adjusting the force settings of your garage door opener is a simple yet important task that can greatly impact the functionality and safety of your garage. By following the steps outlined in this article, you can ensure that your garage door operates smoothly and without any issues. Remember to always consult your garage door opener’s manual and proceed with caution when making adjustments. Regular maintenance and adjustments will keep your garage door opener in top shape for years to come.
Key Takeaways: How to adjust garage door opener force settings?
- Inspect your garage door sensors for any dirt or debris.
- Locate the force adjustment screws on your garage door opener.
- Slowly turn the force adjustment screws to increase or decrease the force.
- Test the force setting by opening and closing the garage door.
- Continue adjusting the force until the door operates smoothly and reverses when obstructed.
Frequently Asked Questions
Are you looking to adjust the force settings on your garage door opener but don’t know where to start? We’ve got you covered! Below are answers to some commonly asked questions about adjusting garage door opener force settings.
1. Why would I need to adjust the force settings on my garage door opener?
Adjusting the force settings on your garage door opener is important for ensuring the safety and proper functioning of your garage door. If the force settings are too high, it can put excessive stress on the door and its components, leading to premature wear and tear. On the other hand, if the force settings are too low, it may prevent the door from closing properly or cause it to reverse unexpectedly.
By adjusting the force settings, you can find the right balance where the door closes smoothly and doesn’t exert unnecessary force on itself or anything that might be in its path. This helps prolong the lifespan of your garage door and ensures the safety of anyone using it.
2. How do I know if the force settings on my garage door opener need adjustment?
There are a few signs that can indicate the need to adjust the force settings on your garage door opener. One common sign is if the door doesn’t close smoothly and consistently. If it starts to close but then immediately reverses or if it takes a lot of force to close the door manually, it’s a good indication that the force settings need adjustment.
Another sign is if the safety sensors are repeatedly triggered, causing the door to reverse. This can happen if the force settings are too high and the sensors detect even the slightest obstruction. Lastly, listening for any unusual grinding or scraping noises while the door is operating can indicate that the force settings are not properly adjusted.
3. How can I adjust the force settings on my garage door opener?
The process for adjusting the force settings may vary depending on the make and model of your garage door opener. However, most modern garage door openers have an adjustment screw or knob that controls the force output. Typically, you’ll need to locate the force adjustment mechanism, which is usually located on the opener unit itself.
Using a flat-head screwdriver or an appropriate tool, you can turn the adjustment screw clockwise to increase the force or counterclockwise to decrease it. It’s important to make small adjustments and test the door after each adjustment to ensure it closes smoothly without excessive force or reversing unexpectedly.
4. Is it necessary to hire a professional to adjust the force settings?
Adjusting the force settings on a garage door opener is a relatively simple task that can be done by most homeowners. However, if you’re unsure or uncomfortable with performing this task yourself, it’s always recommended to hire a professional. They have the knowledge and experience to make accurate adjustments and can ensure that the door is functioning safely and properly.
Hiring a professional also provides peace of mind, as they can inspect other components of the garage door and opener to identify any potential issues. They can make recommendations or perform any necessary maintenance or repairs to keep your garage door in top shape.
5. Are there any safety precautions I should take when adjusting the force settings?
Yes, there are a few safety precautions you should keep in mind when adjusting the force settings on your garage door opener. First and foremost, ensure that the garage door is fully open before attempting to adjust the force settings. This helps prevent any accidental closure of the door during the adjustment process.
Additionally, always follow the manufacturer’s instructions and recommendations when making adjustments. They may provide specific guidelines for your particular model. It’s also a good idea to wear protective eyewear and gloves to prevent any potential injuries while working with the opener mechanism.

Summary
Adjusting the force settings of your garage door opener is important to ensure its proper functioning. Too much force can damage the door or cause accidents, while too little force may prevent the door from closing properly. Follow these steps to adjust the force settings on your garage door opener:
1. Locate the force adjustment knobs or screws on the opener motor unit.
2. Use a screwdriver or pliers to turn the force adjustment knobs or screws.
3. Turn the knob or screw in small increments to increase or decrease the force.
4. Test the door’s sensitivity by opening and closing it manually.
5. Continue adjusting until the door opens and closes smoothly, without any resistance or slams shut.
6. Make sure to test the door’s safety features, such as the photoelectric sensors and auto-reverse mechanism, after adjusting the force settings.
By following these steps, you can ensure that your garage door operates safely and smoothly. Remember, it’s important to consult the manufacturer’s manual for specific instructions related to your garage door opener.